
General Purpose Registers
There are 4 general purpose registers in Intel 8086. Each of the registers is 16 bits wide.
- Accumulator Register AX, used in arithmetic, logic, data transfer, and I/O operations
- Base Register BX, used as address register to form physical address
- Count Register CX, used as a loop counter and used in shift and rotate operations
- Data Register DX, used in multiplication, division, and I/O operations
Each of the registers also can be accessed in 8-bit mode:
- the least significant byte (LSB) or low half of AX is AL and the most significant byte (MSB) or high half of AX is AH
- the least significant byte (LSB) or low half of BX is BL and the most significant byte (MSB) or high half of BX is BH
- the least significant byte (LSB) or low half of CX is CL and the most significant byte (MSB) or high half of CX is CH
- the least significant byte (LSB) or low half of DX is DL and the most significant byte (MSB) or high half of DX is DH
Segment Registers
There are 4 segment registers. Each of the registers is 16 bits wide.
- Code Segment CS, used for addressing code segment of the memory where the executable program is stored. CS register cannot be changed directly.
- Stack Segment SS, used for addressing stack segment of the memory where stack data is stored. SS
register can only be changed directly using
popinstruction. - Data Segment DS, used for addressing data segment of the memory where the program data is stored. DS
register can be changed directly using
popandldsinstructions. - Extra Segment ES, also used for addressing data segment of the memory where the program data is stored.
ES register can be changed directly using
popandlesinstructions.
Index Registers
Index registers are 16 bits wide.
- Source Index SI, used as offset address relative to DS
- Destination Index DI, used as offset address relative to ES
Pointer Registers
Pointer registers are 16 bits wide.
- Stack Pointer SP. Stack Pointer points to the top address of the stack.
- Base Pointer BP. Base Pointer points to the base of the stack.
Status Register
Status register is also called as flag register. There are 16 bits in flag register, each bit is called a flag and can take a value of 1 or 0.

- Carry flag (CF) - this flag is set to 1 when there is an unsigned overflow in arithmetic operation.
The carry flag is set if the addition or multiplication of two numbers causes a carry out the most significant bits added.
Example
mov al,100
add al,200
The result of al is 300. Since al is an 8-bit register, the maximum value it can hold is 255. Therefore, the carry flag will be set to 1.
Let’s take a look at another example
mov ax,30000
add ax,40000
The result of ax is 70000. Since ax is an 16-bit register, the maximum value it can hold is 65535. Therefore, the carry flag will be set to 1.
The carry flag is also set if the subtraction of two numbers requires a borrow into the most significant bits subtracted.
mov al,0
sub al,1
- Overflow flag (OF) - this flag is set to 1 when there is a signed overflow.
Example
mov al,100
add al,100
The result of al is 200. Since al is an 8-bit register, the maximum positive integer it can
hold is 127. Therefore, the overflow flag will be set to 1.
- Sign flag (SF) - this flag is set to 1 when the result is negative.
- Zero flag (ZF) - this flag is set to 1 when the result is zero.
- Parity flag (PF) - this flag is set to 1 when the result has an even number of 1s. Even if the result is a word (16 bits), only 8 low bits are analyzed.
Example
mov ax,32896
add ax,4
The result of ax is 32900 or 10000000 10000100 in binary. Only 8 low bits are checked, since there are 2 bits of 1s in 8 low bits (10000100) the parity flag will be set to 1.
- Auxiliarly flag (AF) - this flag is set to 1 when the result has a carry from 3rd bit to 4th bit. This flag is used as CF when working with BCD (Binary-Coded Decimal).
- Interrupt flag (IF) - this flag is set to 1 to enable interrupts and set to 0 to disable interrupts.
- Direction flag (DF) - this flag is used in string operations to specify whether strings begin at a low address and proceed to high addresses or vice versa. CX is used as the number of iterations, DS:SI is used as the source address and DS:DI is used as the destination. After each iteration, CX is decremented by one, SI and DI are either incremented or decremented by the element size according to DF flag. If DF = 0, SI and DI are incremented, otherwise they are decremented.
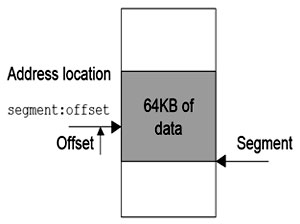
Memory Segmentation and Addressing
The size of address bus of Intel 8086 is 20 bits which is able to address 220=1,048,576 bytes (1 MB) memory locations.
In Real Mode of addressing, the entire memory is not accessed with an absolute index from 0 but it is divided into segments. Size of each segments is 64KB. Only 4 segments we can work with.
| Segment | Segment Register | Offset register |
|---|---|---|
| Code Segment | CS |
Instruction Pointer (IP) |
| Data Segment | SS |
Source Index (SI) |
| Extra Segment | ES |
Destination Index (DI) |
| Stack Segment | SS |
Stack Pointer (SP) / Base Pointer (BP) |
Physical address (RAM) is 20 bits wide. To express a 20-bit address, two 16-bit registers are used segment address in one 16-bit register and the offset address in another 16-bit register. Logical address is specified as segment:offset. Physical address is obtained by shifting the segment address 4 bits tot he left and adding the offset address.
The physical address of the logical address A4FB:4872 is
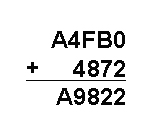
Since segments can be overlap, same byte could also be located by segment:offset combinations 0002:000D or 0001:001D.
Since an offset cannot exceed 16 bits, you cannot increment beyond 64k.
Any memory address evenly divisible by 16 is called a paragraph boundary. The first paragraph boundary is 0. The second is 10H and so on. Any paragraph boundary may be considered the start of a segment.